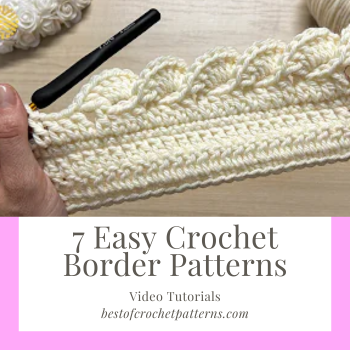
Crochet Border Patterns for Beginners: Simple Techniques for a Professional Finish – Video Tutorials
Are you new to crochet and looking for ways to take your projects to the next level? Then, check out these Seven easy-to-follow crochet border patterns that are perfect for beginners. With simple techniques and step-by-step instructions, you’ll be able to create professional-looking projects that you’ll be proud to show off.
How to Crochet Border Patterns That Add the Perfect Finishing Touch to Any Project,
Crochet has become a popular hobby for many, and for a good reason. Not only is it a great way to unwind and relax, but it also allows you to create unique and beautiful pieces that are all your own.
And when it comes to taking your crochet project to the next level, the perfect border pattern can make all the difference. In this post, we’ll explore the world of crochet borders and give you everything you need to know about choosing the right pattern, playing with color and texture, and incorporating different shapes and sizes.
By the end, you’ll be able to add the perfect finishing touch to any project and create something exceptional. So grab your hook, and let’s get started!
Choosing the Right Border Pattern
When choosing the right border pattern for your crochet project, it’s important to consider the overall look and feel you want to achieve. If you’re looking for something simple and classic, a basic single crochet or shell stitch border may be the way to go. On the other hand, if you’re looking to add some flair and personality to your project, consider a more intricate or unique pattern.
One thing to keep in mind is the size and shape of your project. For example, a wide blanket or scarf may benefit from a wider border to balance out the dimensions, while a small tablecloth or a coaster may only need a thin border to frame the edges.
Additionally, certain shapes may lend themselves better to certain border patterns – for example, a square project may look great with a repeating geometric pattern, while a circular project may benefit from a more organic or flowing border.
Ultimately, the right border pattern will depend on your taste and the specific project you’re working on. So feel free to experiment with different designs and techniques to find the perfect finishing touch for your crochet creation. And in the next section, we’ll explore how to use color to make your border pop!
Using Color to Make Your Border Pop
Another way to make your border stand out is by using color. Choosing the right colors can elevate your project and really make your border pop. You can stick with a monochromatic scheme for a subtle effect or choose complementary or contrasting colors to make a bold statement.
Using varicolored yarn can also create a unique and eye-catching border. You can also experiment with different color placements within a pattern, such as alternating colors in a stripe or using a gradient effect.
Like choosing the right pattern, your chosen color will depend on personal taste and the specific project. But feel free to get creative and play with color to take your border to the next level.
Once you’ve chosen your colors, the next step is to think about texture. How can you add texture to your border to really make it stand out? We’ll explore some ideas in the next section.
Playing with Texture
Just like choosing the right color scheme, adding texture to your crochet border can take it to a whole new level. There are endless possibilities for playing with texture, so don’t be afraid to experiment and find what works best for your project.
One simple way to add texture is by alternating single and double crochet stitches. This creates a ribbed effect that adds depth and interest to your border. Another option is to use puff stitches or popcorn stitches, which create a bumpy, textured surface that adds a playful touch.
If you want to get adventurous, you can incorporate different yarns or fibers into your border. Mix and match textures like cotton, wool, and silk for a truly unique design. You can also use different-sized hooks to create a more varied texture.
In the next section, we’ll explore how to incorporate multiple border patterns for a cohesive and dynamic finished product. By combining texture and pattern, your border will genuinely stand out and bring your crochet project to the next level.
Incorporating Multiple Border Patterns
If you are ready for a challenge, try incorporating multiple border patterns into your crochet project. By using different patterns and textures, you can create a cohesive finished product that stands out. To start, select two or three border patterns that complement each other. For example, you could combine a simple scallop pattern with a more intricate lace design.
To make the process easier, use the same color yarn throughout your borders. This will keep your finished product looking cohesive while allowing the different patterns to shine. You can also experiment with different hook sizes and yarn types to create a more varied texture. Just keep an eye on your tension to ensure your borders are the same length.
In the next section, we’ll explore how to work with different shapes and sizes to create borders that fit any project.
Working with Different Shapes and Sizes
When it comes to crochet borders, not all projects are created equal in terms of size and shape. Some may be rectangular, while others may be circular or even asymmetrical. Fortunately, you can use a few tips and tricks to create borders that fit any project.
First and foremost, it’s essential to consider the size of your project. If you are working with a smaller piece, such as a coaster or washcloth, you may only need a simple single crochet or double crochet border to finish it off. However, if you are working on a larger project, like a blanket or shawl, you may want to incorporate a more intricate border pattern to give it that extra finishing touch.
Another factor to consider is the shape of your project. For example, if you’re working on a rectangular piece like a scarf or afghan, you can easily work the border evenly along each side.
But what about circular or asymmetrical projects? In these cases, you may need to work the border in sections or adjust the pattern to fit the shape of the piece.
One helpful technique for working with different shapes and sizes is to use stitch markers to mark the edges of your project. This will help you keep track of where to start and end each section of the border and ensure that you maintain a consistent stitch count throughout.
Pin this for later here:

Ultimately, experimenting and having fun with different patterns and techniques is the key to creating beautiful crochet borders that fit any project. Whether you’re working on a small coaster or a large blanket, there’s always room to add a unique finishing touch that showcases your creativity and skill.
In summary, adding a border can transform an ordinary crochet project into something extraordinary. Whether it’s using color to make your border pop, playing with texture, or incorporating multiple border patterns, there are endless possibilities to explore.
By taking the time to choose the right border, you can elevate your project to new heights. Remember, the right frame can make all the difference, so don’t be afraid to experiment and find the perfect finishing touch for your crochet creation.
With these tips in mind, start exploring and see where your creativity takes you. As the great Maya Angelou said, “Creativity is courage.” So be brave, be bold, and happy crocheting!
Have a beautiful day, and enjoy crocheting.
Katja