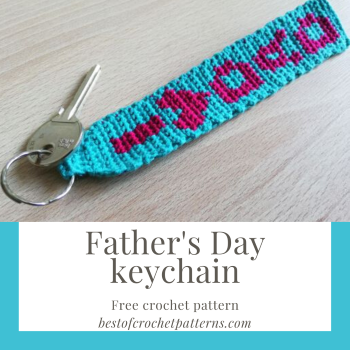
Father’s day keychain – Free crochet pattern
If you are looking for a unique Father’s Day Gift, you came to the right place. Sometimes it is hard to find a gift that is small, practical and would shed a smile on someone’s face. I decided to share with you the free crochet Father’s day keychain pattern. It is fast and easy to make, you only need a small amount of yarn, and it looks adorable.
According to Wikipedia, Father’s Day (or Fathers’ Day) is a day of honoring fatherhood, paternal bonds, and the influence of fathers in society.
It has been celebrated in Catholic countries of Europe on March 19 as Saint Joseph’s Day since the Middle Ages. In America, Father’s Day was founded by Sonora Smart Dodd and celebrated on the third Sunday of June for the first time in 1910.
Father’s Day is held on various days in many parts of the world throughout the year, often in March, May, and June.
In our country (Slovenia), we don’t celebrate Father’s Day. We do however celebrate Saint Joseph’s Day – but only men and women whose name is Joseph or other variant of this name.
Do you celebrate Father’s Day in your country? Please share with me in the comments below.
Crochet I<3DAD Keychain is an easy pattern, you will only need two colors. You can even use your scrap yarn. If you would like more ideas on how to use scrap yarn, you can find them here:
You can read my post on How to do Tapestry Crochet if you are not familiar with tapestry crochet.
You can find another cute idea for Father’s Day Gift in there; it is a Heart Coaster. I think that the XOXO keychain is also a great Father’s Day gift; you can find it here.
Today I will only share written instructions and graphs for how to do I<3DAD Keychain. For more guidance, please refer to my previous posts. You can find them here: Free patterns.
If you decide to make this Father’s Day Keychain and share it on social media, I would love it if you would tag me into the picture. You can find me on Instagram @pretty_things_by_katja and Facebook @Pretty Things By Katja
Thank you.
Supplies:
- 2.75mm or C/2 Crochet Hook
- #2 Fine Weight Yarn in two colors. – You can use different types of yarn, just adjust the size of the hook.
- Yarn Needle
- Metal keyring (you can get everything on Amazon)
Abbreviations:
- CH ~ Chain
- SC ~ Single Crochet
- SL ST ~ Slip Stitch
- RS ~ Right Side
- WS ~ Wrong Side
- MC ~ Main Color
- CC ~ Contrast Color
- ST(S) ~ Stitch(es)
- FO ~ Finish Off
Gauge:
4” x 4” (10 x 10 cm) square /2.75 mm(C/2) -Hook/ Single Crochet/#2 Yarn
• 15 Rows x 10 Stitches
Size:
• 1,1” x 6” (3 x 15 cm) Rectangle
If you are not familiar with the Tapestry Crochet Technique,
please, read this post first (How to do Tapestry Crochet) . Here are
just some quick notes to help you understand the pattern and make your
creation accurately.
Notes:
- Every block of the graph represents one SC.
- You start your color change on the SC just before the color change.
- Remember
to maintain tension. When pulling through with the new color, the
stitch you just completed will lose tension. Be sure to correct it
before moving on. - Be sure that you remember to yarn under when pulling through with the new yarn.
- When
working with the two or more colors at the same time, it’s essential to
check both sides of your work periodically throughout the row to see if
there is any bunching or puckering. I suggest you do this right before
the color change. If you see the non-dominant yarn sticking out, give it
a gentle tug and then gently stretch out the row again to even out the
stitches and smooth out the row. - Remember that each row of the
graph alternates between following it {Right to Left} and {Left to
Right}. Be sure to stitch accordingly.

- I like to highlight each row or SC in the written
instructions as I complete it so that I can easily visualize which SC is
following next. - I like to count my stitches right before the
color change to check if the number is correct. It is a little time
consuming, but I think it is better than to do it all again. - Throughout the project, be sure to carry your contrasting color around on only the WS.


For me, it is easier to do the tapestry crochet with written
instructions, but if you like it better, you can do it by counting
the squares on the graph. I prefer to look at the charts, just to see where I am and how much I still need to do.
Written instructions:
You start by chain 12 with turquoise, begin with Row 1, and SC in the second chain from the hook. You introduce the plum yarn here.
← Row 1 [RS]: (Turquoise) x 11 At the end of the row chain 1 and turn. When you go to the next row, you carry your yarn in the back
→ Row 2 [WS]: (Turquoise) x 2, (Plum) x 5, (Turquoise) x 4 At the end of the Row remember to carry your yarn in the front.
← Row 3 [RS]: (Turquoise) x 3, (Plum) x 6, (Turquoise) x 2
→ Row 4 [WS]: (Turquoise) x 2, (Plum) x 2, (Turquoise) x 3, (Plum) x 2, (Turquoise) x 2
← Row 5 [RS]: (Turquoise) x 2, (Plum) x 2, (Turquoise) x 3, (Plum) x 2, (Turquoise) x 2
→ Row 6 [WS]: (Turquoise) x 2, (Plum) x 2, (Turquoise) x 3, (Plum) x 2, (Turquoise) x 2
← Row 7 [RS]: (Turquoise) x 3, (Plum) x 6, (Turquoise) x 2
→ Row 8 [WS]: (Turquoise) x 2, (Plum) x 5, (Turquoise) x 4
← Row 9 [RS]: (Turquoise) x 11
→ Row 10 [WS]: (Turquoise) x 2, (Plum) x 2, (Turquoise) x 3, (Plum) x 2, (Turquoise) x 2
← Row 11 [RS]: (Turquoise) x 2, (Plum) x 2, (Turquoise) x 3, (Plum) x 2, (Turquoise) x 2
→ Row 12 [WS]: (Turquoise) x 3, (Plum) x 5, (Turquoise) x 3
← Row 13 [RS]: (Turquoise) x 3, (Plum) x 2, Turquoise, (Plum) x 2, (Turquoise) x 3
→ Row 14 [WS]: (Turquoise) x 3, (Plum) x 2, Turquoise, (Plum) x 2, (Turquoise) x 3
← Row 15 [RS]: (Turquoise) x 3, (Plum) x 5, (Turquoise) x 3
→ Row 16 [WS]: (Turquoise) x 4, (Plum) x 3, (Turquoise) x 4
← Row 17 [RS]: (Turquoise) x 11
→ Row 18 [WS]: (Turquoise) x 2, (Plum) x 5, (Turquoise) x 4
← Row 19 [RS]: (Turquoise) x 3, (Plum) x 6, (Turquoise) x 2
→ Row 20 [WS]: (Turquoise) x 2, (Plum) x 2, (Turquoise) x 3, (Plum) x 2, (Turquoise) x 2
← Row 21 [RS]: (Turquoise) x 2, (Plum) x 2, (Turquoise) x 3, (Plum) x 2, (Turquoise) x 2
→ Row 22 [WS]: (Turquoise) x 2, (Plum) x 2, (Turquoise) x 3, (Plum) x 2, (Turquoise) x 2
← Row 23 [RS]: (Turquoise) x 3, (Plum) x 6, (Turquoise) x 2
→ Row 24 [WS]: (Turquoise) x 2, (Plum) x 5, (Turquoise) x 4
← Row 25 [RS]: (Turquoise) x 11
→ Row 26 [WS]: (Turquoise) x 5, Plum, (Turquoise) x 5
← Row 27 [RS]: (Turquoise) x 4, (Plum) x 3, (Turquoise) x 4
→ Row 28 [WS]: (Turquoise) x 3, (Plum) x 5, (Turquoise) x 3
← Row 29 [RS]: (Turquoise) x 2, (Plum) x 7, (Turquoise) x 2
→ Row 30 [WS]: Turquoise, (Plum) x 9, Turquoise
← Row 31 [RS]: Turquoise, (Plum) x 4, Turquoise, (Plum) x 4, Turquoise
→ Row 32 [WS]: (Turquoise) x 2, (Plum) x 2, (Turquoise) x 3, (Plum) x 2, (Turquoise) x 2
← Row 33 [RS]: (Turquoise) x 11
→ Row 34 [WS]: (Turquoise) x 4, (Plum) x 3, (Turquoise) x 4
← Row 35 [RS]: (Turquoise) x 4, (Plum) x 3, (Turquoise) x 4
→ Row 36 [WS]: (Turquoise) x 4, (Plum) x 3, (Turquoise) x 4
← Row 37 [RS]: (Turquoise) x 4, (Plum) x 3, (Turquoise) x 4
→ Row 38 [WS]: (Turquoise) x 4, (Plum) x 3, (Turquoise) x 4
← Row 39 [RS]: (Turquoise) x 4, (Plum) x 3, (Turquoise) x 4
→ Row 40 [WS]: (Turquoise) x 4, (Plum) x 3, (Turquoise) x 4
← Row 41 [RS]: (Turquoise) x 11
→ Row 42 [WS]: dec, (Turquoise) x 7, dec (you have now 9 stitches)
← Row 43 [RS]: dec, (Turquoise) x 5, dec (you have now 7 stitches)
→ Row 44 [WS]: dec, (Turquoise) x 3, dec (you have now 5 stitches)
← Row 45 [RS]: dec, (Turquoise) x 1, dec (you have now 3 stitches)
→ Row 46 [WS]: BACK LOOP ONLY(Turquoise) x 3 (make sure you are on the Wrong site)
← Row 47 [RS]: (Turquoise) x 3
→ Row 48 [WS]: (Turquoise) x 3
You make as many rows you need to come around the keyring, and FO.
Insert the keyring and sow the end with the back loops in row 46 together using a yarn needle.
Pin this for later here:
Congratulations you made it!
Thank you very much for using my pattern. I hope you enjoyed crocheting it as much as I enjoyed making it.
I would love to see your work. If you share it on Facebook and Instagram, make sure you tag me into the photo.
Follow me here:
Thank you very much.
Have a beautiful day, and enjoy crocheting.
Katja