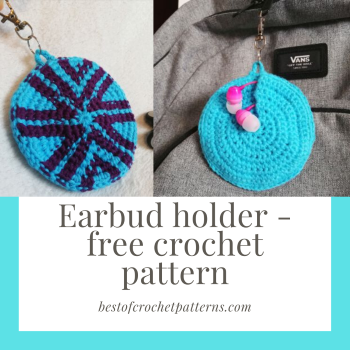
Earbud holder – Free crochet pattern
Please note, some of the links in the text below are affiliate links, which means that if you decide to buy any of their products or services, I’ll receive a small commission. It helps me to maintain my blog, support my family and allows me to continue to create free content. I only recommend products that I use and love. Thank you for your support. For more details click the disclosure
Whether you’re looking for quick crochet gift ideas or just a little something for yourself, this small crocheted pouch is perfect. The crochet earbud holder is a fast, and not too tricky pattern.
If you are like me, then you are probably always looking for your earbuds. Stashing them in a pretty pouch is a great way to make sure that they won’t get lost.
If you don’t use earphones, there are several different uses for this pouch such as, chapstick holder, key holder, coin holder, fidget spinner holder…just, to name a few!
I hope you like my pattern. If you make it, I would love to see your creation, so please, tag me into your post on Facebook or Instagram. You can find me here:
Instagram: https://www.instagram.com/pretty_things_by_katja/
Facebook: www.facebook.com/PrettyThingsByKatja/

Supplies:
- 3.5mm (E/4) Crochet Hook
- #4 Worsted Aran Yarn in two colors – You can use different types of yarn, just adjust the size of the hook. I used Rico Creative Cotton Aran; I think it is perfect for this project, it is cotton yarn available in 63 shades. You can get it at Amazon.
- Yarn Needle
- Key Ring or Key Ring w/ a Lobster Clasp (You can get them at Amazon.)
Abbreviations:
- MR ~ Magic ring
- SC ~ Single Crochet
- INC ~ Increase
- SL ST ~ Slip Stitch
- CH ~ Chain
- ST ~ Stitch(es)
- FO ~ Finish Off
- *(….)* x 8 ~ Repeat the whole sequence eight times
- {16} ~ the number of stitches in the round
- B ~ Blue
- P ~ Purple

Size:
• 3,5″ or 9 cm (round)
The pattern:
If you are not familiar with the tapestry crochet technique, please, read How to do tapestry crochet post fist.
Front Side:
- R1: MR, 8 B (Blue) SC. Pull the ring together, and continue to work in a spiral. {8}
- R2: Introduce P (Purple) yarn. If you want to see the photo tutorial on how to make the color change, you can find it here: Crochet earrings free pattern – Flower with hearts.
You make 8 INC: PP, BP, PB, PP, BP, BP, PB {16} – (PP means INC with Purple stitches, BP means INC with one Blue and one Purple stitch…)
- R3: *(1 SC P, INC (PP), SC B, INC (PP), SC P, INC (BP), SC P, INC (PB))* x 2 {24}
- R4: *(INC (PP), 2 SC P, INC (BP), 1 SC P, 1 SC B, INC (PP), 1 SC B, 1 SC P, INC (PP), 1 SC P, 1 SC B)* x 2 {32}
- R5: *(2 SC P, 1 SC B, INC (PP), 1 SC B, 2 SC P, INC (BB), 1 SC B, 2 SC P, INC (BP), 1 SC P, 1 SC B, 1 SC P, INC (PB))* x2 {40}
- R6: *(2 SC P, 2 SC B, INC (PP), 1 SC B, 2 SC P, 1 SC B, INC (BP), 2 SC B, 2 SC P, INC (BP), 1 SC P, 2 SC B, 1 SC P, INC (PB))* x 2 {48} Here is a photo how the Front side of the Earbud holder looks after six rounds.

- R7: *(2 SC P, 1 SC B, INC (BB), 2 SC P, 1 SC B, 2 SC P, INC (BB),3 SC P, 2 SC B, INC (PP), 1 SC B, 2 SC P,2 SC B, INC (BP), 1 SC P, 1 SC B)* x 2 {56}
- R8: *(2 SC P, 1 SC B, INC (BB), 1 SC B, 2 SC P, 1 SC B, 2 SC P, INC (BB), 2 SC P, 1 SC B, 2 SC P, 1 SC B, INC (BP), 1 SC P, 1 SC B, 2 SC P, 2 SC B, INC (BB), 2 SC P, 1 SC B)* x2 {64}
- R9: *(2 SC P, 1 SC B, INC (BB), 2 SC B, 2 SC P, 1 SC B, 2 SC P, INC (BB), 2 SC P, 3 SC B, 2 SC P, INC (BB), 2 SC P, 1 SC B, 2 SC P, 2 SC B, INC (BB), 1 SC B, 2 SC P, 1 SC B)* x2 {72}
Fasten off and wave in the ends.
Here is the graph of the front side:

Backside:
I chose blue Rico Creative Cotton Aran Yarn, but if you want, you can choose purple.
- R1: MR – 8 SC – This time, you don’t work in a spiral, but you chain 1 and turn. {8}
- R2: 8 INC, CH1, turn {16}
- R3: *(INC, SC)* x 8 , CH1, turn {24}
- R4: INC, SC, *(INC, 2 SC)* x 7, SC, CH1, turn {32}
- R5: *(3 SC, INC)* x 8, CH1, turn {40}
- R6: 2SC, INC *(4 SC, INC)* x 7, 2SC, CH1, turn {48}
- R7: *(5 SC, INC)* x 8, CH1, turn, {56}
- R8: 3SC, INC *(6 SC, INC)* x 7, 3SC, CH1, turn {64}
- R9: *( 7 SC, INC)* x 8, SL ST into the chain frm the previous row. {72}

Do not fasten off. Join the front and the backside, make sure the right side is facing you. Now you work SL ST through the back loop of the front and the back loop of the backside. Look at the photo below.

Work the SL ST all the way around. When you come to the end, you chain 6, skip two stitches, and SL ST into the slip stitch of the previous round. FO, and wave in the end. Now all you have to do is fasten the key ring.

Congratulations, you have finished Earbud holder pouch. I hope you like my pattern if you have any questions, feel free to contact me or write a comment below.
Pin this pattern for latter here:
If you make an earbud holder, I would love to see your creation, so please, tag me into your post on Facebook or Instagram. You can find me here:
Instagram: https://www.instagram.com/pretty_things_by_katja/
Facebook: www.facebook.com/PrettyThingsByKatja/
Have a beautiful day, and enjoy crocheting.
Katja


Hi Katja. I’ll try this today. Making an earbud holder seems rather simple so I’ll give it a try. You have also encouraged me to continue learning and I’ll stop by our local store to buy a few yarns of different colors. I’ll also go right now to How to do tapestry crochet. Thank you very much!
Thank you so much, I am so happy to hear this. I will publish a lot more patterns, my head is full of ideas 🙂 So follow me for more.
Have a beautiful day, and enjoy crocheting.
I really love the designs I have seen here and honesty, I see that they are all beautiful! I have not seen people holding earbuds in here before so, this would really be a style that will be unique to me. I am a big fan of crotchet patterns and seeing that it can be used for quite small things like this too is great to see. Thank you so much for sharing.
Thank you very much. I am always losing my earbuds, that is why I decided to make a pouch for it.
I am glad you like my patterns, and you find them useful.
Have a nice day.
I particularly like the simple pattern that you came up with for this earbud holder. As you mentioned, they can come in very handy for stashing items that can be easily lost. For me personally, that means my key holder in particular. I don’t exactly use earphones so I guess I’m safe from that worry. Nice job, Thanks for sharing
Thank you very much. I am glad you find it useful.
Follow me for more 🙂
Have a beautiful day.
I think this is a really cute idea. I’m always losing my earbuds and generally when I find them they’re all tangled up in a clump. I think I might make a couple of these and then keep one in my car, one attached to my backpack and maybe even one on my keyring? The sound easy enough to make so may as well go crazy with it lol. Thanks for sharing the pattern.
Thank you so much, I am so happy to hear that you like my pattern. Because of comments like this, I love to share free patterns.
If you make it and share it on social media, please, tag me – I would love to see it. Thank you so much.
Have a beautiful day.
Crocheting is such a skill that I always admire, I see my wife do it over and over again, I love the earbud holder, the size that is very portable and the way you handle your colures too are top of it. I am sending the link to my wife for her personal viewing and I assure you she will share what ever is done with you via the FB link.
Thank you very much. I am so happy to hear that. I hope your wife will love it too.
Have a beautiful day.