How to crochet Crab Stitch – Step by step tutorial
Please note, some of the links in the text below are affiliate links, which means that if you decide to buy any of their products or services, I’ll receive a small commission. It helps me to maintain my blog, support my family and allows me to continue to create free content. I only recommend products that I use and love. Thank you for your support. For more details click the disclosure
I was looking for an easy and simple border to put around my Heart Coaster. I think the Crab Stitch, or as it is sometimes called The Reverse Single Crochet is perfect for the job. What do you think?
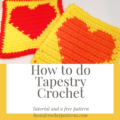
You can find the free pattern for The Heart Coaster here: How to do Tapestry Crochet – Step by Step tutorial

Crab stitch is a popular stitch for finishing off the edge of a blanket. The stitch is dense, so it is excellent if you are looking for a border that does not have holes.
The crab stitch is also known as a reverse single crochet because you are working in the opposite direction you would typically work. So for right-handed crocheters, you work from left to right, and left-handed crocheters work from right to left. That’s it. 🙂
The actual mechanics of a reverse single crochet stitch are the same as for a regular single crochet — except in reverse.
Instead of working from right to left, you work from left to right. It creates a somewhat twisted, rounded edge that’s good for making a simplistic finished edge for your work.
Do you think it is too complicated to work in the opposite direction? It really isn’t difficult, and with this step by step photo tutorial, you can learn the crab stitch.
If you can single crochet, you can do it in reverse! 🙂
Abbreviation for Crab Stitch is – reverse sc.
The symbol in the graph looks like this:  You usually don’t work stitches into the tops of the reverse single crochet, that is why you won’t find this stitch in the middle of a project.
If you make a round of regular single crochet before adding the reverse single crochet border can make the entire process simpler.
Remember to save this tutorial on Pinterest so you can come back to it later!

Step 1:
Making sure the right side is facing you, join yarn and chain 1, or if you are making the border with the same color as the body, just ch 1. Instead of going into the stitch to the left (as usual), you are going to work into the stitch to the right.
Insert the hook, from front to back, in the next stitch to the right.
It is hard to show this in photographs, that is why I am also showing you the images from https://www.dummies.com/crafts/crocheting/stitches/
You can also find it in the book: Crochet for Dummies
This book is useful for the first-time crocheter, or if you are looking to expand your skills, Crocheting For Dummies
shows you how to choose the right tools, create basic stitches, and finish off your work. It provides step-by-step
instructions and full-color photos for the basics as well as more advanced techniques. It has 368 pages, so I think it really covers everything you want to learn about crochet.


Step 2:
Yarn over (yo) and pull the yarn through the stitch.
This step is similar to how you work a regular single crochet — only backward.

Step 3:
Yarn over and pull the yarn through the two loops on the hook.
One reverse single crochet is complete.

Step 4:
Repeat the preceding steps in each stitch across the row.
This image shows several completed reverse single crochet stitches.

In the corners, you are making the same reverse single crochet. If you crochet a regular single crochet border before doing the row with the crab stitch, you have three single crochet in the corner. You make a crab stitch in each of them.
Step 5:
To complete your crab stitch border, stop when you’ve reached the stitch you started in.
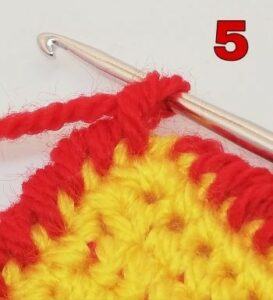
Instead of making a crab stitch in that first stitch, slip stitch into the same stitch you started in. Cut your yarn and pull through. When you weave in your ends, you’ll want to weave the tail through the stitches to the right.
Your project is finished!
What do you think? Is it complicated? Will you use this border on your projects?
You can use the Crab stitch border on The Heart Coaster Pattern.
Which border do you use the most? You can tell me in the comments below.
Have a beautiful day, and enjoy crocheting.
Katja

As one who took up crochet nearly fifty years ago after a serious stomach operation really enjoyed this article. Have rarely picked up my hook for some time but found your article or lesson to very useful, informative and very easy to follow for anyone who does not know the crab stitch or anything about the subject.
Your photographs and diagrams are excellent, out of interest have used this stitch for years when doing grandchildren’s and great grand children’s pram blankets and did not know that it had a name, so thanks for that.
Thank you so much for your comment. I didn’t know the name of the stitch either. I am learning the names as I go. My mother also crochet for thitry years and she knows the Slovenian terms, and I know the US ones because I learn a lot from the internet. Sometimes we don’t understand each other, we have to describe the stitch to know what we mean. It is kinda funny.
I would love to see your creations. If you like, you can share it with me on my Facebook page.
Have a beautiful day, and enjoy crocheting.
I have always thought that crochet seemed difficult. I really enjoyed your how to crochet crab stitch article.
You broke crocheting down into such easy steps! I might just give it a try.
Thank you so much for your articles on crocheting. I will keep checking back for more of your great articles!
Alisha
Thank you so much. I am glad you find it useful. I will do my best to write valuable content in the future.
Have a beautiful day. And if you decide to try crocheting, you can share it with me on my Facebook page.
Hi, looking at this article brought back some pleasant memories for me. My mom used to enjoy making these types of things with her sowing.
I like the warm feel of these things. I also like the genuine authentic feel that they have. I t is a very relaxing activity too. I have learned to sow myself when I was younger and I enjoyed it.
I like the pictures and find them helpful, very nice step by step instructions.
Nice work, I enjoyed reading this.
Thanks
Thank you very much. I am glad you enjoyed it.
Have a nice day.
Hi There,
My name is Ayten and I think your choice in niche is great!
Firstly, I love the colour scheme going on in your website, It’s very eye-catching.
Also, I can definitely use this post as a guide to help with future references as you use great images and diagrams to help understand how to create crochet patterns and on top of that you explain each step clearly.
Thank you for sharing your post, I will be looking out for more ; )
Ayten.
Hi Ayten. Thank you for your comment. I am glad you find it useful. I really did try to explain each step clearly, but it is a little hard to show that in pictures. I am happy you think it is understandable.
Have a nice day and enjoy crocheting.
Hi Katja, thank you for this tutorial of how to crochet a crab stitch, it was simple, well explained and informative. I am not very crafty but I like crochet, sewing. I was doing some knitting lessons but it took me so long to finish a project. Your site is colourful and very encouraging .I will visit sometimes and I will share it with friends. Thank you!
Thank you very much. I am glad you find it useful. And thank you for sharing with friends.
Have a nice day.